Thursday, April 26, 2012

Fat Lady ART


Today I heard about an artists' statue that has some people in an uproar.  This Naked Fat Lady (named Venus) statue is located here in Tempe, AZ (Rural & Broadway).  The artist of this statue has installed it as part of a renovation to an apartment building he owns.  People like the job he did on the building to improve their property values but it seems some of them don't like the statue.  The artist did go to city hall and got approval to display the Fat Lady but shortly after she was perched on the building people started complaining.


This morning, in an attempt to please the public, the artist has given the Naked Fat Lady a fig leaf bikini made from dollar bills.  Now she looks more like a fat stripper!  This story was aired on FOX 10 News http://www.myfoxphoenix.com/.  They have a poll asking viewers if the statue is still to offensive.  The numbers at the time of this posting were No 73% and Yes 28%.

Throughout modern time ART has been controversial at times.

Saturday, April 21, 2012

Quilted Symphony Help


Today is a lazy kinda day here in the desert.  Even though it is still spring according to the calendar it feels like summer has arrived with temps predicted to reach triple digits today.  The husband is off spending the day pursuing his passion (racing) which gives me a quiet day to hang... with the cats... and FABRIC.  It's the perfect opportunity to work on my quilted symphony project.  This project has challenged me (I don't know why).  It's not the most challenging or original thing I've ever done so I'm a littler perplexed as to WHY it has been challenging.  Jazzy (the cat) seems to sense the challenge and sticks close by for moral support.  :o)


Thursday, April 19, 2012

The Fabric Has Rusted!

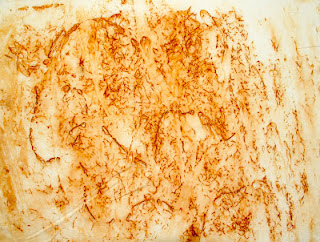
Well here it is!  My rusted fabric.


 This started as a fat quarter of white muslin.  A steel wool pad was the metal I used to grow rust on my fabric.  You know the stuff you do heavy scrubbing with. Does anybody still use this stuff for cleaning?  The steel wool was pulled apart and laid on top of the fabric.  Then a wine bottle was placed in the center and the fabric was pulled up around the bottle.  Copper wire was then wrapped around the fabric covered bottle to hold it in place for the rusting process.


This is also fat quarter size.  Steel wool and a copper wire was sandwiched between two pieces of fabric and then rolled up (like a cigar).  The whole thing was wrapped with wire to hold it together for rusting.


Here are the pieces my rusting friends made.


Created by Alicia.

Created by Alicia.

Created by Cathy.

Created by Jane. 
This piece was not done on muslin like the rest.  Jane used a printed piece of green fabric.
She has a turtle in mind that must become a quilt so her goal was to end up with a perfect piece of turtle fabric.  This one will definitely work for her turtle!
 
Created by Judy.

Created by Judy.
This was just a scrap of fabric (the teal color is actually Judy's shirt) that turned out beautiful.


Created by LaVon.


Created by LaVon.
This piece is a little different because steel wool was not her rusting material of choice.  Instead LaVon wrapped this piece of fabric around an old horseshoe.  Pretty cool huh.

Everyone was so pleased with the results of this process that they have already started collecting old rusted things to use the next time we rust.


Thursday, April 12, 2012

Rusting Fabric?


Meet the R U A Quilter group.  These gals let me hang out with them on a regular basis to do FUN things involving fabric.  Earlier this week we got together at a particularly creative members house and she shared with us the ins and outs of RUSTING FABRIC.  The process of creating an environment that allows fabric to rust was very quick and easy.  It was the show and tell, the awesome food and the all around chatting that took several more hours.  But what a FUN day it was!


So here we are with a table full of cheap and easy to obtain items that will allow us to RUST our muslin (also cheap) fabric.  Some items were even recycled from the trash, like soda and wine bottles.  As you can see Jane and I (at the end of the table) had to do a little team work to convince a piece of copper wire that it really did want to be wrapped around a bottle.  What's a friend to do?  That's one reason why we tend to do projects like this together!  And that's Marty (our token snowbird) in the front very proud that she has her wine bottle and fabric under control.


So here's a close up for you.  This is one of Judy's pieces.  That's a LOT of wire and I think she managed to get it on there all by herself.  Now that's a talent in itself! 

You start with muslin drenched in a vinegar solution (or printed fabric in Jane's case, there's always one renegade).  You place bits of rusted metal, or metal that will rust, on the fabric.  Then wrap it around something (or roll it up around itself) and hold it securely in place with wire or rubber bands.  The crucial step is then to keep it wet (for days) with the vinegar solution to promote the growth of RUST.  


 This is what we ended up with after everything was drenched and wrapped up with metal and rusty stuff.  And after a couple of hours of eating, sharing other projects and stories... It pretty much looked the SAME!  Now I was raised on the east coast where the humidity RUSTS stuff, so I know the process can literally take years.  But for some reason I expected to see some progress (and was disappointed that my STUFF wasn't RUSTING).


Our little projects were left with the EXPERIENCED RUSTER of the group.  She promised to tend our jewels with lots of vinegar solution.  Low and behold they started to RUST!  By the next morning I received this photo from her.  I'm told it can take up to six days for the rusting results to reach their full potential.  I can't wait to see what we have all created!

I'll post some pictures when we get to the end of the RUSTING process.